Understanding the eMail inChorus Whiteboard
The eMail inChorus Whiteboard is the canvas where you compose your multimedia messages.
Think of the Whiteboard as your drawing board.
To help you to familiarize yourself with the Whiteboard, this
section provides a description of the Whiteboard menus, commands,
and features. Details on how to perform specific actions, such
as how to compose an audio message or creating a simple animation,
are described in Creating Basic eMail inChorus Messages or Advanced eMail inChorus Features.
Using the Whiteboard Features
eMail inChorus' Whiteboard features a set of contols and tools
to help you compose your message. The location of these features
are shown in the illustration below.
Recording Controls
eMail inChorus uses a time-based technology to record all the
activities you perform on the Whiteboard in chronological order.
Every time an object on the Whiteboard changes, it is time-stamped.
This feature enables your messages to play back exactly as recorded.
In the lower left portion of the Whiteboard screen are the recording
controls.
The table below provides you with a description of each component
of the recording controls.
| Component |
Description |
| Current time |
Displays the current point of time in the recorded
message. |
| Total time |
Displays the total time of the recorded message. |
| Record |
Click to begin recording. |
| Beginning |
Click to rewind the recording to the beginning. |
| Reverse |
Click to reverse the message. |
| Play |
Click to play the message. |
| End |
Click to forward to the end of the message. |
| Stop |
Click to stop playing or recording. |
| Decrement time |
Click to move the current time backward by a tenth of a second. |
| Time scroll |
Click and drag to the left or right to access a specific time
point in the message. |
| Increment time |
Click to move the current time forward by a tenth of a second. |
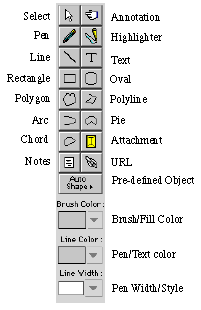
Drawing Toolbar
The Drawing Toolbar on the right side of the Whiteboard contains toggle
switches to activate the tools for drawing objects on the Whiteboard,
as well as a couple special function buttons.
The table below provides you with a description of each component
of the Drawing Toolbar. Clicking the button toggles activation
of the tool on or off or opens a menu of options.
| Component |
Description |
| Select |
Use to select an object on the Whiteboard. |
| Pen |
Use to draw freehand pen lines. |
| Line |
Use to draw straight lines. |
| Rectangle |
Use to draw a rectangle. |
| Polygon |
Use to draw a polygon. |
| Arc |
Use to draw an arc. |
| Chord |
Use to draw a chord. |
| Notes |
Use to attach notes on the Whiteboard. |
| Annotation |
Use to add annotations to the Whiteboard. |
| Highlighter |
Use to draw highlighter pen lines. |
| Text |
Use to enter text on the Whiteboard. |
| Oval |
Use to draw an oval. |
| Polyline |
Use to draw polylines. |
| Pie |
Use to draw pie shape. |
| Attachment |
Use to add file attachments to the Whiteboard. |
| URL |
Use to add a hot link to an URL to the Whiteboard. |
| Pre-defined Object |
Click to display a menu of pre-defined objects, such as arrows
and other graphics that can be placed on the Whiteboard. |
| Brush/Fill Style |
Click to choose a fill color and pattern for the selected Whiteboard
object or the active drawing tool. Use to create solid filled
shapes. |
| Pen Width/Style |
Click to choose a pen width/style for a selected Whiteboard object
or the active drawing tool. |
| Pen/Text color |
Click to select a new pen/text color of a selected object or active
drawing tool. |
eMail inChorus' Whiteboard is object-based. This means that each
graphical object (such as ovals, squares, and lines) have properties
such as location, color, or style. You can view and change the
properties of any of the Drawing Tool objects by selecting the
object and then clicking the right mouse button. This displays
a dialog box containing the properties of the object.
Audio Controls
eMail inChorus' audio controls, located on the lower portion of the Whiteboard
screen, allow you to control the volume of audio messages during
recording or playback.
Page Navigator
eMail inChorus' page controls are located on the lower right portion
of the Whiteboard screen. These controls allow you to navigate
through the pages of a message, as well as add or remove pages.
The table below provides you with a descriptions of each component
of the Page Navigator.
| Component |
Description |
| Current page |
Displays the current page number. |
| Total pages |
Displays the total number of pages in the Whiteboard. |
| First page |
Click to jump to the first page. |
| Previous page |
Click to turn to the previous page. |
| Next page |
Click to turn to the next page. |
| Last page |
Click to jump to the last page. |
| Insert page after |
Click to insert a new page after the current page. |
| Insert page before |
Click to insert a new page before the current page. |
| Delete page |
Click to delete the current page. |
| Clear page |
Click to erase the content of the current page leaving it blank. |
Whiteboard Menu Commands
The tables below provide you with a description of the menu commands
available from the Whiteboard screen.
File Menu Commands
| Command |
Description |
| New Message |
Click to start a new message. |
| Open Message |
Click to open an existing message. |
| Close |
Click to close the Whiteboard window. |
| Save |
Click to save the current message. |
| Save As |
Click to save the current message under a different name. |
| Open Whiteboard |
Click to open a saved Whiteboard file. |
| Save Whiteboard |
Click to save the graphical contents of the current Whiteboard
to a file. |
| Import/Picture |
Click to import an image to the Whiteboard. |
| Import/Page File |
Click to import a saved Whiteboard page to the current Whiteboard. |
| Import/Whiteboard File |
Click to import a saved Whiteboard content file (multiple pages)
to the current Whiteboard. |
| Import/Text File |
Click to import a text file to the Whiteboard. |
| Export/As Picture |
Click to save the current graphical page as an image file. |
| Export/As Page File |
Click to save the current graphical page as a page file. |
| Send Message |
Click to send the composed message to the specified destination. |
| Page Setup |
Click to change the printer and print options. |
| Print |
Click to print the active Whiteboard contents. |
| Quit |
Click to exit eMail inChorus. |
Edit Menu Commands
| Command |
Description |
| Undo |
Click to undo the last action. |
| Cut |
Click to cut the selected object and move it
to the Clipboard. |
| Copy/Object |
Click to copy the selected object(s) to the
Clipboard. |
| Copy/Page |
Click to copy the current graphical page contents
to the Clipboard. |
| Paste |
Click to insert the Clipboard contents to the
selected location. |
| Clear |
Click to delete the selected object(s). |
| Object Properties |
Click to edit the attributes of the selected
object, including colors and styles. |
| Page Properties |
Click to edit the attributes of the current
page, including width, height, and background color. |
| Preferences |
Click to display the dialog box for user setup options. |
Page Menu Commands
| Command |
Description |
| Go to Page |
Click to display a list of the current Whiteboard pages and then
click a page to jump to. |
| Next Page |
Click to go to the next page. |
| Previous Page |
Click to go to the previous page. |
| First Page |
Click to go to the first page. |
| Last Page |
Click to go to the last page. |
| Insert Page After |
Click to insert a new page after the current page. |
| Insert Page Before |
Click to insert a new page before the current page. |
| Delete Page |
Click to delete the current page. |
| Clear Page |
Click to erase the contents of the current page leaving it blank. |
Object Menu Commands
| Command |
Description |
| Group |
Click to group several selected objects to form a grouped object. |
| Ungroup |
Click to ungroup a selected grouped object. |
| Bring To Front |
Click to move the selected object(s) to the front of the Whiteboard. |
| Up One Level |
Click to move the selected object(s) up one level on the Whiteboard. |
| Down One Level |
Click to move the selected object(s) down one level on the Whiteboard. |
| Send To Back |
Click to move the selected object(s) to the back of the Whiteboard. |
Font Menu
The Font menu lists all of the available font names. This menu
becomes active when you are entering text on the Whiteboard.
Style Menu
The Style menu contains commands used to manipulate text, such
as bolding the text, aligning the text, or setting the font size.
Tools Menu Commands
| Command |
Description |
Screen Capture
|
Click to graphically capture an area of the screen.
|
Create Bitmap
Place-holder Tool |
Click to enable the bitmap-holder tool. This
tool allows you to draw a bitmap box on the whiteboard when you are creating
a template. |
Create
Text Place-holder Tool |
Click to enable the text-holder tool. This
tool allows you to draw a text box on the whiteboard when you are creating
a template. |
Help Menu Commands
| Command |
Description |
| About Balloon Help |
Click to display a description of Balloon Help. |
| Show/Hide Balloon Help |
Click to toggle Balloon Help on or off. |
| inChorus Help |
Clic to display online help. |
| Register |
Click to display the registration form. Once you fill in the text
boxes, click OK to email the form to Softlink. |
| Technical Support |
Click to connect directly to the support web page. |
| Purchase Online |
Click to connect directly to the Softlink product web page where
you can purchase products online. |
| Home |
Click to connect directly to the Softlink web site home page. |